In my continuing blog series on the impending Zombie Apocalypse, I found an item I thought could be useful. One thing you have to count on when it comes to Zombies is you have to be able to travel fast. That also assumes you must be able to travel light. I have found something that fits that bill.
The Light My Fire Spork. You can find them on the web here.
Davo found mine at an outlet mall for me. I take my lunch most days so it is currently very useful. I have one big one and two smaller ones.
Tuesday, July 26, 2011

Wednesday, July 13, 2011
The Zombie Apocalypse
After watching a show called the 100 best tech gadgets ever, Dave and I have starting making a list of things to have to survive the Zombie Apocalypse. It started out as a running joke for a couple of days but now it has blossomed into a full blown obsession.
Our first list consisted of: A Zippo Lighter, a MagLight Flashlight, a Leatherman Tool, one of those army knives and a hand crank radio,
Then we added fuel for the Zippo Lighter and one of those shake flash lights people sold during the Y2K scare.
Then I decided we would need to be able to eat so I figured you had to have cast iron pans to cook with. The premise being that there would be no electricity so you would have to cook over an open flame/camp fire and cast iron is the best way (just ask any cowboy you might meet.) In that spirit I spent the weekend cooking in my cast iron dutch ovens (I have two) and plotting how to convert my recipes into cooking over low/slow heat.
So I decided to blog about the Zombie Apocalypse Survival Kit. Stay Tuned.
Our first list consisted of: A Zippo Lighter, a MagLight Flashlight, a Leatherman Tool, one of those army knives and a hand crank radio,
Then we added fuel for the Zippo Lighter and one of those shake flash lights people sold during the Y2K scare.
Then I decided we would need to be able to eat so I figured you had to have cast iron pans to cook with. The premise being that there would be no electricity so you would have to cook over an open flame/camp fire and cast iron is the best way (just ask any cowboy you might meet.) In that spirit I spent the weekend cooking in my cast iron dutch ovens (I have two) and plotting how to convert my recipes into cooking over low/slow heat.
So I decided to blog about the Zombie Apocalypse Survival Kit. Stay Tuned.
Wednesday, June 22, 2011
Shoppe Hop

Thank you for stopping by. At the Scrapbook Shoppe, the design team decided to try a Shoppe Hop. We were given the same set of papers and asked to make a layout. The paper are: Reminisce I Can Count, Reminisce Wild Boy Stripe and Reminisce Let's Ride.
My design also included these items from the Shoppe: Color Box Cat Eyes in Chalkboard and Creamy Brown, Black Stickles, 12x12 card stock in red, yellow and brown. From my stash at home I used: Close to My Heart Alphabet Stamps, Black Ink, Waxed Twine and Buttons.
Your next stop on the hop is Sandy's Blog. Don't forget to stop the the Scrapbook Shoppe to see Judy's designs and to pick up the supplies.
Sunday, June 19, 2011


New! Disney Pages


I have had the Disney mojo going for some time now. I sat down and designed some pages for my best friend. She will have her pick of these pages next year to make her own Disney Scrapbook.
Friday, June 3, 2011
Bottle Cap Key Chains

I am playing around with some crafts trying to make give-aways for the Kaleidoscope Track. What do you think?
Sunday, May 8, 2011
3 Sister's Photo Organization Plan
When most of us decide to start scrap booking, our first hurdle is usually a huge stack of photos. No matter the subject or the number of photos, it is typically a large pile. Organization of these photos is the key. I will site an example from my past .
After my grandmother passed away, my Aunt Shirley took possession of 93 years of photographs that spanned at least 5 generations. My Aunt wanted to divide the pictures between herself, my mother and my Aunt Lucy. She gave it the good ole college try and ended up with 3 big overwhelming piles of pictures instead of one. My Mom called me to help out. I purchased some CM Photo Sorting Boxes and instructed everyone to bring a shoe box and a package of index cards. I also brought along 3 of David's shoe boxes. He wears a size 15 so, his shoe boxes are pretty big.
I decide the pictures would be sorted by the following categories: Wife/Husband, Child #1, Child #2, Child #3. Then any grand kids, great grand kids would be sorted under their Parent "child". There was also another shoe box for things like group shots, family friends or professional shots. We used the shoe boxes to sort the photos and the index cards as tab dividers with subjects written on the cards. The pictures were divided into in the shoe boxes. Once all the dups or "throw away" pictures were sorted out, the shoe boxes were then sorted in to the Large CM Photo Storage boxes for long term/dark storage. At the end of the weekend each "sister" had organized box of pictures to take home.
Using my story as an example, take your pile of pictures and sort them. Make large over all themes and then sort down into more detail. This works just as well digitally on your computer. If you chose to sort electronically, make large general subject folders, sort pictures into general folders. Then inside each general folder sort pictures into smaller more detailed groups. It has to make sense to you, that is what matters. Not everyone feels the need to sort chronologically. Sort by vacation, theme, subject, holiday.
During your first big sort of pictures, do not worry about page layouts. If you find yourself in a creative mode and ideas are coming to you, write them down on a legal pad.
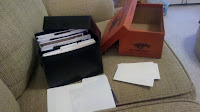
A CM Small Photo Storage Box and a Shoe Box Example
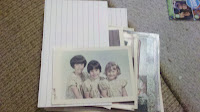
An Example of the photos with the index card in between.

Creative Memories Photo Storage Link
After my grandmother passed away, my Aunt Shirley took possession of 93 years of photographs that spanned at least 5 generations. My Aunt wanted to divide the pictures between herself, my mother and my Aunt Lucy. She gave it the good ole college try and ended up with 3 big overwhelming piles of pictures instead of one. My Mom called me to help out. I purchased some CM Photo Sorting Boxes and instructed everyone to bring a shoe box and a package of index cards. I also brought along 3 of David's shoe boxes. He wears a size 15 so, his shoe boxes are pretty big.
I decide the pictures would be sorted by the following categories: Wife/Husband, Child #1, Child #2, Child #3. Then any grand kids, great grand kids would be sorted under their Parent "child". There was also another shoe box for things like group shots, family friends or professional shots. We used the shoe boxes to sort the photos and the index cards as tab dividers with subjects written on the cards. The pictures were divided into in the shoe boxes. Once all the dups or "throw away" pictures were sorted out, the shoe boxes were then sorted in to the Large CM Photo Storage boxes for long term/dark storage. At the end of the weekend each "sister" had organized box of pictures to take home.
Using my story as an example, take your pile of pictures and sort them. Make large over all themes and then sort down into more detail. This works just as well digitally on your computer. If you chose to sort electronically, make large general subject folders, sort pictures into general folders. Then inside each general folder sort pictures into smaller more detailed groups. It has to make sense to you, that is what matters. Not everyone feels the need to sort chronologically. Sort by vacation, theme, subject, holiday.
During your first big sort of pictures, do not worry about page layouts. If you find yourself in a creative mode and ideas are coming to you, write them down on a legal pad.

A CM Small Photo Storage Box and a Shoe Box Example

An Example of the photos with the index card in between.

Creative Memories Photo Storage Link
Subscribe to:
Posts (Atom)